반응형
우분투에 NGINX와 Tomcat 멀티 인스턴스를 설치하고 설정하는 방법
미들웨어 디렉토리 생성
sudo mkdir /app미들웨어 디렉토리로 이동
cd /appOracle Java 설치
Oracle JDK를 다운로드하려면 Oracle의 웹사이트에서 직접 다운로드 링크를 받아와야 합니다.
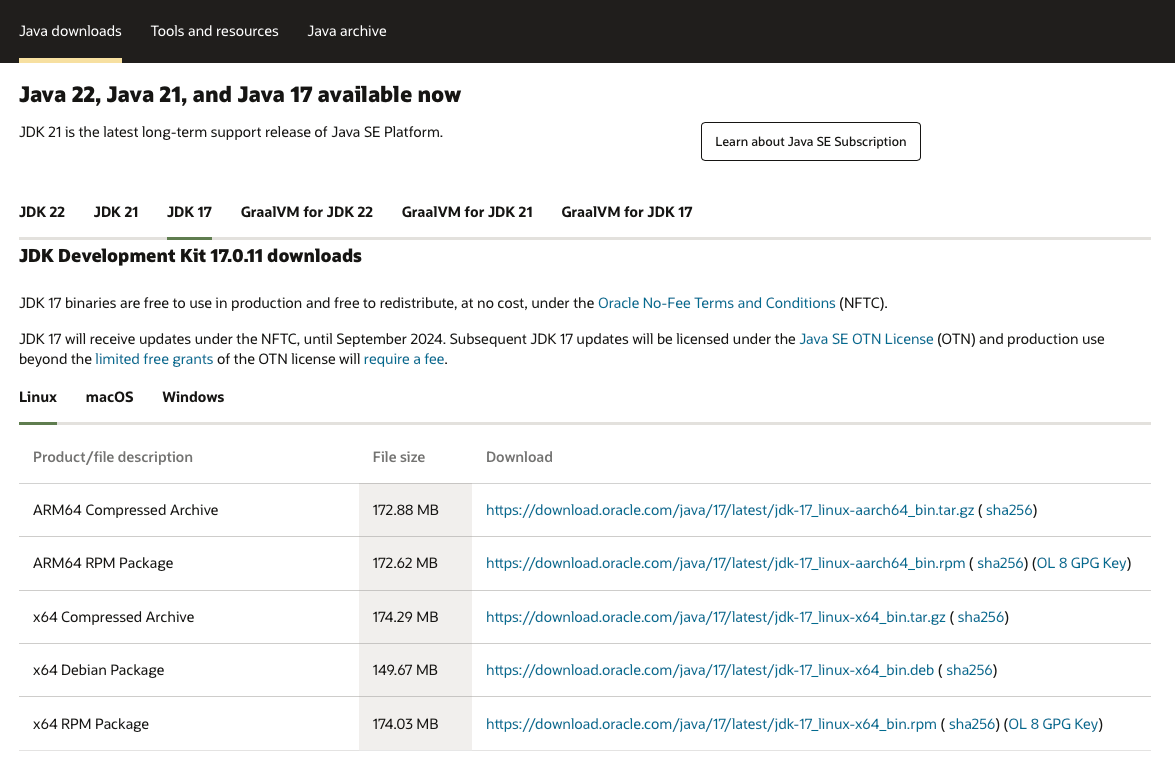
Oracle JDK 다운로드
wget https://download.oracle.com/java/17/archive/jdk-17.0.10_linux-aarch64_bin.tar.gzJava 디렉토리 생성
sudo mkdir -p /app/javaJava 압축 해제
sudo tar -xzf jdk-17.0.10_linux-aarch64_bin.tar.gz -C /app/java --strip-components=1환경 변수 설정 파일 생성
Oracle JDK를 시스템의 기본 Java로 설정하기 위해 환경 변수를 설정합니다.
cat << 'EOF' > /etc/profile.d/jdk.sh
export JAVA_HOME=/app/java
export PATH=$PATH:$JAVA_HOME/bin
EOF
환경 변수 적용
source /etc/profile.d/jdk.shJava 버전 확인
java -version$ java -version
java version "17.0.10" 2024-01-16 LTS
Java(TM) SE Runtime Environment (build 17.0.10+11-LTS-240)
Java HotSpot(TM) 64-Bit Server VM (build 17.0.10+11-LTS-240, mixed mode, sharingNGINX 설치
스크립트 작성
cat << 'EOF' > /tmp/install_nginx.sh
#!/bin/bash

set -e

# 업데이트 및 필수 패키지 설치
sudo apt-get update
sudo apt-get install -y curl gnupg2 ca-certificates lsb-release ubuntu-keyring apt-transport-https

# Nginx GPG 키 추가
curl -s https://nginx.org/keys/nginx_signing.key | gpg --dearmor -o /usr/share/keyrings/nginx-archive-keyring.gpg

# Nginx 공식 저장소 추가
echo "deb [signed-by=/usr/share/keyrings/nginx-archive-keyring.gpg] http://nginx.org/packages/ubuntu $(lsb_release -cs) nginx" | sudo tee /etc/apt/sources.list.d/nginx.list

# 패키지 목록 업데이트 및 Nginx 설치
sudo apt-get update
sudo apt-get install -y nginx

# Nginx 상태 확인
sudo systemctl status nginx
EOF
실행 권한 부여
chmod +x /tmp/install_nginx.sh실행
bash /tmp/install_nginx.shNGINX 시작 및 부팅 시 자동 시작 설정
sudo systemctl enable nginxsudo systemctl start nginxTomcat 설치 (멀티 인스턴스)
Tomcat 디렉토리 생성
sudo mkdir -p /app/tomcat/{instance1,instance2}Tomcat 다운로드
wget https://downloads.apache.org/tomcat/tomcat-9/v9.0.89/bin/apache-tomcat-9.0.89.tar.gzinstance1 디렉토리에 압축 해제하고 Tomcat 인스턴스 디렉토리를 복사
sudo tar -xzf apache-tomcat-9.0.89.tar.gz -C /app/tomcat/instance1 --strip-components=1instance2 디렉토리에 압축 해제하고 Tomcat 인스턴스 디렉토리를 복사
sudo tar -xzf apache-tomcat-9.0.89.tar.gz -C /app/tomcat/instance2 --strip-components=1각 인스턴스의 포트 설정 변경
- /app/tomcat/instance1/conf/server.xml 파일에서 기본 포트(8081)를 원하는 포트로 변경합니다.
vim /app/tomcat/instance1/conf/server.xml...
<Server port="8001" shutdown="SHUTDOWN">
<Listener className="org.apache.catalina.startup.VersionLoggerListener" />
<!-- Security listener. Documentation at /docs/config/listeners.html
<Listener className="org.apache.catalina.security.SecurityListener" />
-->
<!-- APR library loader. Documentation at /docs/apr.html -->
<Listener className="org.apache.catalina.core.AprLifecycleListener" SSLEngine="on" />
<!-- Prevent memory leaks due to use of particular java/javax APIs-->
<Listener className="org.apache.catalina.core.JreMemoryLeakPreventionListener" />
<Listener className="org.apache.catalina.mbeans.GlobalResourcesLifecycleListener" />
<Listener className="org.apache.catalina.core.ThreadLocalLeakPreventionListener" />
...
<Connector port="8081" protocol="HTTP/1.1"
connectionTimeout="20000"
readirectPort="8443"
maxParameterCount="1000"
/>
...- /app/tomcat/instance2/conf/server.xml 파일에서 기본 포트(8082)를 원하는 포트로 변경합니다.
vim /app/tomcat/instance2/conf/server.xml...
<Server port="8002" shutdown="SHUTDOWN">
<Listener className="org.apache.catalina.startup.VersionLoggerListener" />
<!-- Security listener. Documentation at /docs/config/listeners.html
<Listener className="org.apache.catalina.security.SecurityListener" />
-->
<!-- APR library loader. Documentation at /docs/apr.html -->
<Listener className="org.apache.catalina.core.AprLifecycleListener" SSLEngine="on" />
<!-- Prevent memory leaks due to use of particular java/javax APIs-->
<Listener className="org.apache.catalina.core.JreMemoryLeakPreventionListener" />
<Listener className="org.apache.catalina.mbeans.GlobalResourcesLifecycleListener" />
<Listener className="org.apache.catalina.core.ThreadLocalLeakPreventionListener" />
...
<Connector port="8082" protocol="HTTP/1.1"
connectionTimeout="20000"
readirectPort="8443"
maxParameterCount="1000"
/>
...Tomcat 인스턴스 시작 스크립트 설정
사용자 및 그룹 생성
sudo groupadd tomcatsudo useradd -s /bin/false -g tomcat -d /app/tomcat tomcatsudo chown -R tomcat:tomcat /app/tomcat인스턴스 1
sudo vim /etc/systemd/system/tomcat-instance1.service[Unit]
Description=Tomcat Instance 1
After=network.target
[Service]
Type=forking
User=tomcat
Group=tomcat
Environment=CATALINA_PID=/app/tomcat/instance1/temp/tomcat.pid
Environment=CATALINA_HOME=/app/tomcat/instance1
Environment=CATALINA_BASE=/app/tomcat/instance1
Environment=JAVA_HOME=/app/java
ExecStart=/app/tomcat/instance1/bin/startup.sh
ExecStop=/app/tomcat/instance1/bin/shutdown.sh
Restart=on-failure
[Install]
WantedBy=multi-user.target인스턴스 2
sudo vim /etc/systemd/system/tomcat-instance2.service[Unit]
Description=Tomcat Instance 2
After=network.target
[Service]
Type=forking
User=tomcat
Group=tomcat
Environment=CATALINA_PID=/app/tomcat/instance2/temp/tomcat.pid
Environment=CATALINA_HOME=/app/tomcat/instance2
Environment=CATALINA_BASE=/app/tomcat/instance2
Environment=JAVA_HOME=/app/java
ExecStart=/app/tomcat/instance1/bin/startup.sh
ExecStop=/app/tomcat/instance1/bin/shutdown.sh
Restart=on-failure
[Install]
WantedBy=multi-user.targetTomcat 인스턴스 시작 및 부팅 시 자동 시작 설정
sudo systemctl daemon-reload인스턴스 1
sudo systemctl enable tomcat-instance1sudo systemctl start tomcat-instance1인스턴스 2
sudo systemctl enable tomcat-instance2sudo systemctl start tomcat-instance2NGINX와 Tomcat 연동 설정
NGINX 설정 파일 편집
vim /etc/nginx/conf.d/default.conf설정 추가
server {
    listen 80;
    server_name localhost;

    access_log /var/log/nginx/host.access.log main;

    #error_page  404              /404.html;

    # redirect server error pages to the static page /50x.html
    #
    error_page   500 502 503 504  /50x.html;
    location = /50x.html {
        root   /usr/share/nginx/html;
    }

    location / {
        proxy_pass http://localhost:8081;
        proxy_set_header Host $host;
        proxy_set_header X-Real-IP $remote_addr;
        proxy_set_header X-Forwarded-For $proxy_add_x_forwarded_for;
        proxy_set_header X-Forwarded-Proto $scheme;
    }

    location /app2/ {
        proxy_pass http://localhost:8082;
        proxy_set_header Host $host;
        proxy_set_header X-Real-IP $remote_addr;
        proxy_set_header X-Forwarded-For $proxy_add_x_forwarded_for;
        proxy_set_header X-Forwarded-Proto $scheme;
        rewrite ^/app2/(.*) /$1 break;
    }
}
NGINX 설정 테스트 및 재시작
sudo nginx -tsudo systemctl restart nginx브라우저 접근 테스트
웹 브라우저에서 http://example.com로 접근하여 첫 번째 Tomcat 인스턴스를 테스트합니다.
- 인스턴스 1
http://localhost/
- 인스턴스 2
http://example.com/app2/로 접근하여 두 번째 Tomcat 인스턴스를 테스트합니다.
http://localhost/app2/테스트 JSP 페이지 생성
- 인스턴스 1
cat << 'EOF' > /app/tomcat/instance1/webapps/ROOT/index.jsp
<%@ page language="java" contentType="text/html; charset=UTF-8" pageEncoding="UTF-8" %>
<!DOCTYPE html>
<html lang="ko">
<head>
    <meta charset="UTF-8">
    <meta name="viewport" content="width=device-width, initial-scale=1.0">
    <title>TOMCAT devsp3(Instance1) - TOMCAT TEST</title>
</head>
<body>
    <div class="container">
        <h1>TOMCAT TEST</h1>
        <pre>
운영체제: <%= System.getProperty("os.arch") %>
데이터모델: <%= System.getProperty("sun.arch.data.model") %>
클래스경로: <%= System.getProperty("java.class.path", ".") %>
라이브러리경로: <%= System.getProperty("java.library.path", ".") %>
파라메터: <%= request.getParameter("param") %> ('한글'이라고 표기되어야 함)

파일인코딩: <%= System.getProperty("file.encoding") %>
시스템캐릭터셋: <%= java.nio.charset.Charset.defaultCharset().name() %>
페이지캐릭터셋: <%= response.getCharacterEncoding() %>

서블릿 경로: <%= application.getRealPath("") %>
        </pre>
    </div>
</body>
</html>
EOF
- 인스턴스 2
cat << 'EOF' > /app/tomcat/instance2/webapps/ROOT/index.jsp
<%@ page language="java" contentType="text/html; charset=UTF-8" pageEncoding="UTF-8" %>
<!DOCTYPE html>
<html lang="ko">
<head>
    <meta charset="UTF-8">
    <meta name="viewport" content="width=device-width, initial-scale=1.0">
    <title>TOMCAT devsp3(Instance1) - TOMCAT TEST</title>
    <style>
        body {
            font-family: Arial, sans-serif;
            background-color: #f4f4f9;
            color: #333;
            margin: 0;
            padding: 20px;
        }
        .container {
            max-width: 800px;
            margin: 0 auto;
            background: #fff;
            padding: 20px;
            border-radius: 10px;
            box-shadow: 0 0 10px rgba(0, 0, 0, 0.1);
        }
        h1 {
            text-align: center;
            color: #4CAF50;
        }
        pre {
            background: #f9f9f9;
            padding: 15px;
            border-radius: 5px;
            overflow: auto;
        }
    </style>
</head>
<body>
    <div class="container">
        <h1>TOMCAT TEST</h1>
        <pre>
운영체제: <%= System.getProperty("os.arch") %>
데이터모델: <%= System.getProperty("sun.arch.data.model") %>
클래스경로: <%= System.getProperty("java.class.path", ".") %>
라이브러리경로: <%= System.getProperty("java.library.path", ".") %>
파라메터: <%= request.getParameter("param") %> ('한글'이라고 표기되어야 함)

파일인코딩: <%= System.getProperty("file.encoding") %>
시스템캐릭터셋: <%= java.nio.charset.Charset.defaultCharset().name() %>
페이지캐릭터셋: <%= response.getCharacterEncoding() %>

서블릿 경로: <%= application.getRealPath("") %>
        </pre>
    </div>
</body>
</html>
EOF
Ubuntu에 NGINX와 Tomcat 멀티 인스턴스를 성공적으로 설치하고 설정할 수 있습니다.
oracle_java
728x90
반응형
'리눅스' 카테고리의 다른 글
| Tomcat 세션 클러스터링이란 무엇일까요? (0) | 2024.05.20 |
|---|---|
| Laravel 애플리케이션의 요청에 대한 로그를 파일에 기록하는 방법 (0) | 2024.05.20 |
| Vim에서 한글 깨짐 문제를 해결하는 방법 (0) | 2024.05.17 |
| 우분투에 최신 버전의 파이썬를 설치하는 방법 (0) | 2024.05.16 |
| 우분투에 Python 3를 설치하는 방법 (0) | 2024.05.14 |


