반응형
원도우에서 Visual Studio Code(VS Code)를 사용하여 Spring Boot 프로젝트를 생성하는 방법
1. 필수 소프트웨어 설치
VS Code 설치
Java Development Kit (JDK) 설치
Gradle 설치
2. Spring Initializr로 프로젝트 생성
vscode에서 F1 누르면 커맨드 팔레트(Command palette)가 나타납니다.
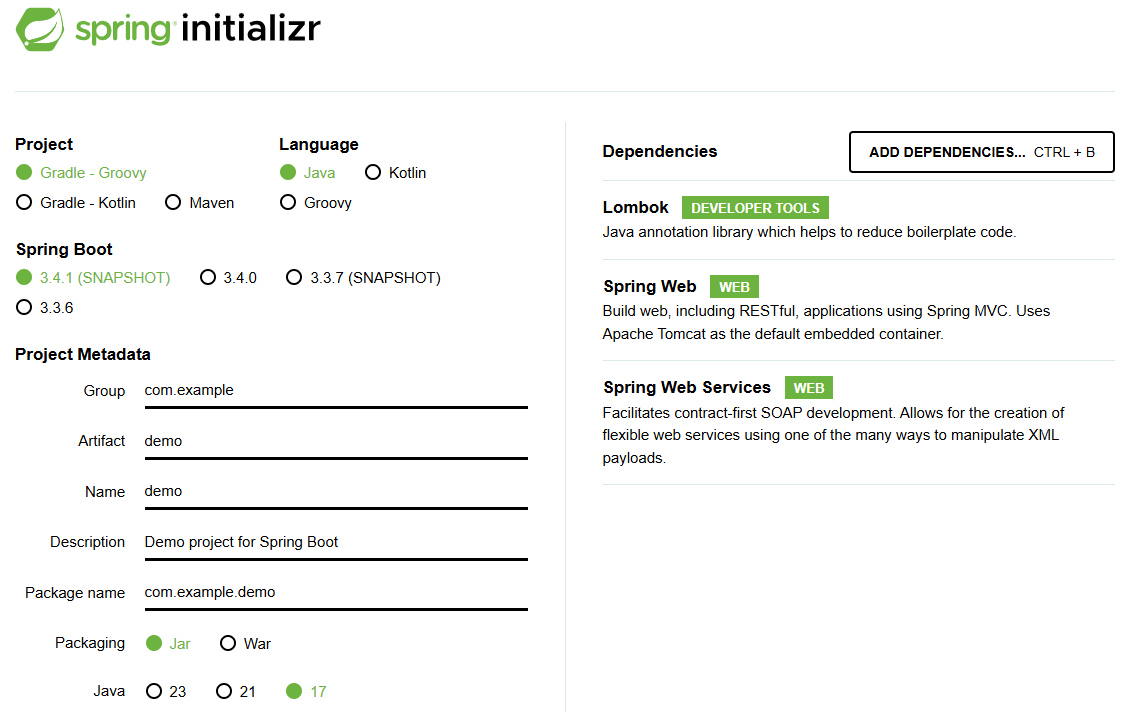
커맨드 팔레트에서 "spring"으로 검색하여 아래와 같이 프로젝트를 생성합니다.
- 프로젝트 생성(Gradle) : Spring Initializr: Create a Gradle Project
- 스프링 부트 버전 선택 : 3.4.0
- 프로젝트 언어 선택 : Java
- Group Id 입력 : com.example
- Artifact Id 입력 : demo
- 패키지 타입 선택 : Jar
- Jave 버전 선택 : 21
- 의존성 설정 : Spring Boot DevTools, Spring Web, Lombok
DemoApplication.java 편집
package com.example.demo;

import org.springframework.boot.SpringApplication;
import org.springframework.boot.autoconfigure.SpringBootApplication;
import org.springframework.web.bind.annotation.GetMapping;
import org.springframework.web.bind.annotation.RestController;

@RestController
@SpringBootApplication
public class DemoApplication {

	public static void main(String[] args) {
		SpringApplication.run(DemoApplication.class, args);
	}

	@GetMapping(value = "/")
	public String doGetHelloWorld() {
		return "Hello World";
	}

	@GetMapping(value = "/demo")
	public String doGetHelloWorldDemo() {
		return "Hello World (Demo)";
	}
}
gradlew 빌드
./gradlew buildJava HotSpot(TM) 64-Bit Server VM warning: Sharing is only supported for boot loader classes because bootstrap classpath has been appended
BUILD SUCCESSFUL in 5s
7 actionable tasks: 4 executed, 3 up-to-datejava -jar build/libs/demo-0.0.1-SNAPSHOT.jar
Invoke-WebRequest를 사용하여 HTTP 상태를 확인
Invoke-WebRequest -Uri "http://localhost:8080"StatusCode : 200
StatusDescription :
Content : Hello World
RawContent : HTTP/1.1 200
Keep-Alive: timeout=60
Connection: keep-alive
Content-Length: 11
Content-Type: text/plain;charset=UTF-8
Date: Mon, 09 Dec 2024 05:10:28 GMT
Hello World
Forms : {}
Headers : {[Keep-Alive, timeout=60], [Connection, keep-alive], [Content-Length, 11], [Content-Type, text/plain;charset=UTF-8]...}
Images : {}
InputFields : {}
Links : {}
ParsedHtml : mshtml.HTMLDocumentClass
RawContentLength : 11http://localhost:8080/
Spring Initalizr
https://start.spring.io

DemoApplication.java 편집
demo\src\main\java\com\example\demo\DemoApplication.javapackage com.example.demo;
import java.net.InetAddress;
import java.net.UnknownHostException;
import java.time.LocalDateTime;
import java.time.format.DateTimeFormatter;
import java.util.UUID;
import org.springframework.boot.SpringApplication;
import org.springframework.boot.autoconfigure.SpringBootApplication;
import org.springframework.web.bind.annotation.GetMapping;
import org.springframework.web.bind.annotation.RestController;
@SpringBootApplication
public class DemoApplication {
public static void main(String[] args) {
SpringApplication.run(DemoApplication.class, args);
}
}
@RestController
class HelloWorldController {
@GetMapping("/")
public String home() {
StringBuilder response = new StringBuilder();
// Current Date and Time
LocalDateTime currentDateTime = LocalDateTime.now();
DateTimeFormatter formatter = DateTimeFormatter.ofPattern("yyyy-MM-dd HH:mm:ss");
String formattedDateTime = currentDateTime.format(formatter);
// Hostname and IP Address
String hostname = "Unknown";
String ipAddress = "Unknown";
try {
InetAddress inetAddress = InetAddress.getLocalHost();
hostname = inetAddress.getHostName();
ipAddress = inetAddress.getHostAddress();
} catch (UnknownHostException e) {
// Log the error for debugging purposes
System.err.println("Failed to get host information: " + e.getMessage());
}
// Instance Directory
String instanceDir = System.getProperty("user.dir");
// Generate a random session ID (for demo purposes)
String sessionId = UUID.randomUUID().toString();
// Build the response
response.append("<h1>Hello, World from Blue-Green Deployment!!!</h1>")
.append("<p><b>Hostname:</b> ").append(hostname).append("</p>")
.append("<p><b>IP Address:</b> ").append(ipAddress).append("</p>")
.append("<p><b>Instance Directory:</b> ").append(instanceDir).append("</p>")
.append("<p><b>Instance ID:</b> ").append(sessionId).append("</p>")
.append("<p><b>Current time:</b> ").append(formattedDateTime).append("</p>");
return response.toString();
}
}더보기
---
package com.example.demo;

import java.io.File;
import java.net.InetAddress;
import java.net.UnknownHostException;
import java.time.LocalDateTime;
import java.time.format.DateTimeFormatter;

import org.springframework.boot.SpringApplication;
import org.springframework.boot.autoconfigure.SpringBootApplication;
import org.springframework.web.bind.annotation.GetMapping;
import org.springframework.web.bind.annotation.RestController;

import java.util.UUID;

@SpringBootApplication
public class DemoApplication {

    public static void main(String[] args) {
        SpringApplication.run(DemoApplication.class, args);
    }
}

@RestController
class HelloWorldController {

    @GetMapping("/")
    public String home() throws UnknownHostException {
        LocalDateTime currentDateTime = LocalDateTime.now();
        DateTimeFormatter formatter = DateTimeFormatter.ofPattern("yyyy-MM-dd HH:mm:ss");
        String formattedDateTime = currentDateTime.format(formatter);

        String hostname = InetAddress.getLocalHost().getHostName();
        String ipAddress = InetAddress.getLocalHost().getHostAddress();

        // Get instance directory (assuming user.dir points to it)
        String instanceDir = System.getProperty("user.dir");

		// 세션 정보를 쿠키에 저장
		String sessionId = UUID.randomUUID().toString();

        return "<br>" +
			"Hello, World from Blue-Green Deployment!!!<br>" +
			"<br>" +
			"Hostname: " + hostname + "<br>" +
			"IP Address: " + ipAddress + "<br>" +
			"<br>" +
			"Instance Directory: " + instanceDir + "<br>" +
			"Instance ID: " + sessionId  + "<br>" +
			"Current time: " + formattedDateTime;
    }
}
---
http://localhost:8080/
728x90
반응형
'원도우' 카테고리의 다른 글
| 원도우에서 MongoDB의 GUI 도구인 MongoDB Compass를 설치하는 방법 (0) | 2024.12.11 |
|---|---|
| 원도우에서 Gradle을 설치하는 방법 (1) | 2024.12.09 |
| 원도우 2000 기본 데스크탑 색상 (0) | 2024.11.28 |
| 원도우 정품 인증을 수행하는 방법 (0) | 2024.11.27 |
| 원도우 11에서 "이 사진에 대해 자세히 알아보기" 아이콘을 제거하는 방법 (0) | 2024.11.05 |


