반응형
우분투에서 Elasticsearch를 설치하고 Kibana를 사용하여 클러스터 상태를 확인하는 방법(elasticsearch 8.12.1)
운영체제 환경설정
- Limits 설정
- File Descriptors
- Locked in Memory
- Number of Threads
cat << EOF >> /etc/security/limits.conf

### elasticsearch
elasticsearch       hard    nofile   65535
elasticsearch       soft    nofile   65536
elasticsearch       hard    nproc    65536
elasticsearch       soft    nproc    65536
elasticsearch       hard    memlock  unlimited
elasticsearch       soft    memlock  unlimited
EOF- Virtual Memory
echo "vm.max_map_count = 262144" | sudo tee -a /etc/sysctl.conf- Swap 사용 안 함
echo "vm.swappiness = 1" | sudo tee -a /etc/sysctl.confsudo sysctl -p- Disable swapping
sudo swapoff -asudo sed -i '/swap/ s/^/#/' /etc/fstabElasticsearch, Kibana 삭제
더보기
---
sudo apt-get purge -y --allow-change-held-packages elasticsearchsudo rm -rf /etc/elasticsearch /var/lib/elasticsearchsudo rm -rf /etc/default/elasticsearch /usr/share/doc/elasticsearch /var/log/elasticsearchsudo apt-get purge -y --allow-change-held-packages kibanasudo rm -rf /etc/kibana /var/lib/kibanasudo apt-get autoremove -y---
Elasticsearch 설치
sudo apt-get install -y apt-transport-httpsGPG 키 추가
wget -qO - https://artifacts.elastic.co/GPG-KEY-elasticsearch | sudo gpg --dearmor -o /usr/share/keyrings/elasticsearch-keyring.gpgElasticsearch 저장소 추가
echo "deb [signed-by=/usr/share/keyrings/elasticsearch-keyring.gpg] https://artifacts.elastic.co/packages/8.x/apt stable main" | sudo tee /etc/apt/sources.list.d/elastic-8.x.listAPT 저장소 업데이트
sudo apt-get updateElasticsearch 패키지 설치
sudo apt-get install -y elasticsearch--------------------------- Security autoconfiguration information ------------------------------
Authentication and authorization are enabled.
TLS for the transport and HTTP layers is enabled and configured.
The generated password for the elastic built-in superuser is : IT-FMSfCEhw+1_W+vHsz
If this node should join an existing cluster, you can reconfigure this with
'/usr/share/elasticsearch/bin/elasticsearch-reconfigure-node --enrollment-token <token-here>'
after creating an enrollment token on your existing cluster.
You can complete the following actions at any time:
Reset the password of the elastic built-in superuser with
'/usr/share/elasticsearch/bin/elasticsearch-reset-password -u elastic'.
Generate an enrollment token for Kibana instances with
'/usr/share/elasticsearch/bin/elasticsearch-create-enrollment-token -s kibana'.
Generate an enrollment token for Elasticsearch nodes with
'/usr/share/elasticsearch/bin/elasticsearch-create-enrollment-token -s node'.
-------------------------------------------------------------------------------------------------
### NOT starting on installation, please execute the following statements to configure elasticsearch service to start automatically using systemd
sudo systemctl daemon-reload
sudo systemctl enable elasticsearch.service
### You can start elasticsearch service by executing
sudo systemctl start elasticsearch.servicebuilt-in superuser(elastic)의 비밀번호를 셸에 환경 변수로 저장
export ELASTIC_PASSWORD="IT-FMSfCEhw+1_W+vHsz"echo $ELASTIC_PASSWORDelasticsearch.service 설정 파일 편집
vim /usr/lib/systemd/system/elasticsearch.service[Service]
LimitMEMLOCK=infinityElasticsearch 설정 파일 편집(/etc/elasticsearch/elasticsearch.yml)
vim /etc/elasticsearch/elasticsearch.yml#cluster.name: my-application
#node.name: node1
path.data: /var/lib/elasticsearch
path.logs: /var/log/elasticsearch
bootstrap.memory_lock: true
#network.host: 192.168.0.1
http.port: 9200
#discovery.seed_hosts: ["node1", "node2", "node3"]
xpack.security.enabled: true
xpack.security.enrollment.enabled: true
xpack.security.http.ssl:
enabled: true
keystore.path: certs/http.p12
xpack.security.transport.ssl:
enabled: true
verification_mode: certificate
keystore.path: certs/transport.p12
truststore.path: certs/transport.p12
cluster.initial_master_nodes: ["node1"]
#cluster.initial_master_nodes: ["node1", "node2", "node3"]
http.host: 0.0.0.0Elasticsearch 서비스 시작 및 활성화
sudo systemctl daemon-reloadsudo systemctl --now enable elasticsearch.serviceElasticsearch 서비스 재시작/중지
sudo systemctl restart elasticsearch.servicesudo systemctl stop elasticsearch.serviceElasticsearch 상태 확인
sudo systemctl status elasticsearchElasticsearch API 사용
Elasticsearch API를 통해 클러스터 상태를 확인
curl --cacert /etc/elasticsearch/certs/http_ca.crt -u elastic:$ELASTIC_PASSWORD https://localhost:9200$ curl --cacert /etc/elasticsearch/certs/http_ca.crt -u elastic:$ELASTIC_PASSWORD https://localhost:9200
{
"name" : "node1",
"cluster_name" : "elasticsearch",
"cluster_uuid" : "Qr4VeMmnSWaEa2chrR2KTA",
"version" : {
"number" : "8.12.1",
"build_flavor" : "default",
"build_type" : "deb",
"build_hash" : "6185ba65d27469afabc9bc951cded6c17c21e3f3",
"build_date" : "2024-02-01T13:07:13.727175297Z",
"build_snapshot" : false,
"lucene_version" : "9.9.2",
"minimum_wire_compatibility_version" : "7.17.0",
"minimum_index_compatibility_version" : "7.0.0"
},
"tagline" : "You Know, for Search"
}Cluster Health 확인
curl --cacert /etc/elasticsearch/certs/http_ca.crt -u elastic:$ELASTIC_PASSWORD https://localhost:9200/_cluster/health?pretty$ curl --cacert /etc/elasticsearch/certs/http_ca.crt -u elastic:$ELASTIC_PASSWORD https://localhost:9200/_cluster/health?pretty
{
"cluster_name" : "elasticsearch",
"status" : "green",
"timed_out" : false,
"number_of_nodes" : 1,
"number_of_data_nodes" : 1,
"active_primary_shards" : 1,
"active_shards" : 1,
"relocating_shards" : 0,
"initializing_shards" : 0,
"unassigned_shards" : 0,
"delayed_unassigned_shards" : 0,
"number_of_pending_tasks" : 0,
"number_of_in_flight_fetch" : 0,
"task_max_waiting_in_queue_millis" : 0,
"active_shards_percent_as_number" : 100.0
}클러스터 통계 정보 확인
curl --cacert /etc/elasticsearch/certs/http_ca.crt -u elastic:$ELASTIC_PASSWORD https://localhost:9200/_cluster/stats?pretty노드 정보 확인
curl --cacert /etc/elasticsearch/certs/http_ca.crt -u elastic:$ELASTIC_PASSWORD https://localhost:9200/_cat/nodes?v$ curl --cacert /etc/elasticsearch/certs/http_ca.crt -u elastic:$ELASTIC_PASSWORD https://localhost:9200/_cat/nodes?v
ip heap.percent ram.percent cpu load_1m load_5m load_15m node.role master name
127.0.0.1 26 97 0 0.07 0.27 0.23 cdfhilmrstw * node1인덱스 정보 확인
curl --cacert /etc/elasticsearch/certs/http_ca.crt -u elastic:$ELASTIC_PASSWORD https://localhost:9200/_cat/indices?prettybuilt-in superuser 비밀번호 재설정
/usr/share/elasticsearch/bin/elasticsearch-reset-password -u elastic$ /usr/share/elasticsearch/bin/elasticsearch-reset-password -u elastic
This tool will reset the password of the [elastic] user to an autogenerated value.
The password will be printed in the console.
Please confirm that you would like to continue [y/N]y
Password for the [elastic] user successfully reset.
New value: iD9rnfktinzuE7qD=uwb더보기
---
Kibana 인스턴스에 등록 토큰 생성
/usr/share/elasticsearch/bin/elasticsearch-create-enrollment-token -s kibanaElasticsearch 노드 등록 토큰 생성
/usr/share/elasticsearch/bin/elasticsearch-create-enrollment-token -s nodehttp.p12의 비밀번호 확인
/usr/share/elasticsearch/bin/elasticsearch-keystore show xpack.security.http.ssl.keystore.secure_passwordtransport.p12의 비밀번호 확인
/usr/share/elasticsearch/bin/elasticsearch-keystore show xpack.security.transport.ssl.keystore.secure_password---
728x90
Kibana 설치
Kibana 패키지 설치
sudo apt-get install -y kibanaKibana 암호화 키를 생성
/usr/share/kibana/bin/kibana-encryption-keys generate$ /usr/share/kibana/bin/kibana-encryption-keys generate
## Kibana Encryption Key Generation Utility
The 'generate' command guides you through the process of setting encryption keys for:
xpack.encryptedSavedObjects.encryptionKey
Used to encrypt stored objects such as dashboards and visualizations
https://www.elastic.co/guide/en/kibana/current/xpack-security-secure-saved-objects.html#xpack-security-secure-saved-objects
xpack.reporting.encryptionKey
Used to encrypt saved reports
https://www.elastic.co/guide/en/kibana/current/reporting-settings-kb.html#general-reporting-settings
xpack.security.encryptionKey
Used to encrypt session information
https://www.elastic.co/guide/en/kibana/current/security-settings-kb.html#security-session-and-cookie-settings
Already defined settings are ignored and can be regenerated using the --force flag. Check the documentation links for instructions on how to rotate encryption keys.
Definitions should be set in the kibana.yml used configure Kibana.
Settings:
xpack.encryptedSavedObjects.encryptionKey: 5755be1116bc378d6c29b7550fbc6328
xpack.reporting.encryptionKey: 23bcb72e36e5accc10684250e4afcebf
xpack.security.encryptionKey: a3ce55b61a9a854a3d4f3a8cbf9a6cb0cat <<EOF >> /etc/kibana/kibana.yml
## Kibana Encryption Key Generation Utility
xpack.encryptedSavedObjects.encryptionKey: 5755be1116bc378d6c29b7550fbc6328
xpack.reporting.encryptionKey: 23bcb72e36e5accc10684250e4afcebf
xpack.security.encryptionKey: a3ce55b61a9a854a3d4f3a8cbf9a6cb0
EOF
/usr/share/elasticsearch/bin/elasticsearch-keystore show xpack.security.http.ssl.keystore.secure_password$ /usr/share/elasticsearch/bin/elasticsearch-keystore show xpack.security.http.ssl.keystore.secure_password
u9lrFpvPRWC49w2lHVZCPA
mkdir /etc/kibana/certscd /etc/kibana/certscp /etc/elasticsearch/certs/http_ca.crt /etc/kibana/certs/.cp /etc/elasticsearch/certs/http.p12 /etc/kibana/certs/.openssl pkcs12 -in http.p12 -cacerts -nokeys -out CA.pem -passin pass:u9lrFpvPRWC49w2lHVZCPAopenssl pkcs12 -in http.p12 -nocerts -nodes -out client.key -passin pass:u9lrFpvPRWC49w2lHVZCPAopenssl pkcs12 -in http.p12 -clcerts -nokeys -out client.crt -passin pass:u9lrFpvPRWC49w2lHVZCPAchown -R kibana.kibana /etc/kibana/certs
/usr/share/elasticsearch/bin/elasticsearch-reset-password -i -u kibana_system$ /usr/share/elasticsearch/bin/elasticsearch-reset-password -i -u kibana_system
This tool will reset the password of the [kibana_system] user.
You will be prompted to enter the password.
Please confirm that you would like to continue [y/N]y
Enter password for [kibana_system]:
Re-enter password for [kibana_system]:
Password for the [kibana_system] user successfully reset.
Kibana 설정 파일 편집(/etc/kibana/kibana.yml)
vim /etc/kibana/kibana.ymlserver.port: 5601
server.host: "0.0.0.0"
elasticsearch.hosts: ["https://localhost:9200"]
elasticsearch.username: "kibana_system"
elasticsearch.password: "kibana_system_password"
elasticsearch.ssl.certificate: /etc/kibana/certs/client.crt
elasticsearch.ssl.key: /etc/kibana/certs/client.key
elasticsearch.ssl.certificateAuthorities: [ "/etc/kibana/certs/CA.pem" ]
elasticsearch.ssl.verificationMode: full
logging:
appenders:
file:
type: file
fileName: /var/log/kibana/kibana.log
layout:
type: json
root:
appenders:
- default
- file
pid.file: /run/kibana/kibana.pid
xpack.encryptedSavedObjects.encryptionKey: 5755be1116bc378d6c29b7550fbc6328
xpack.reporting.encryptionKey: 23bcb72e36e5accc10684250e4afcebf
xpack.security.encryptionKey: a3ce55b61a9a854a3d4f3a8cbf9a6cb0
sudo systemctl daemon-reloadsudo systemctl --now enable kibana.service
sudo systemctl restart kibanasudo systemctl status kibanaKibana 웹 브라우저에서 확인(웹 브라우저)
http://localhost:5601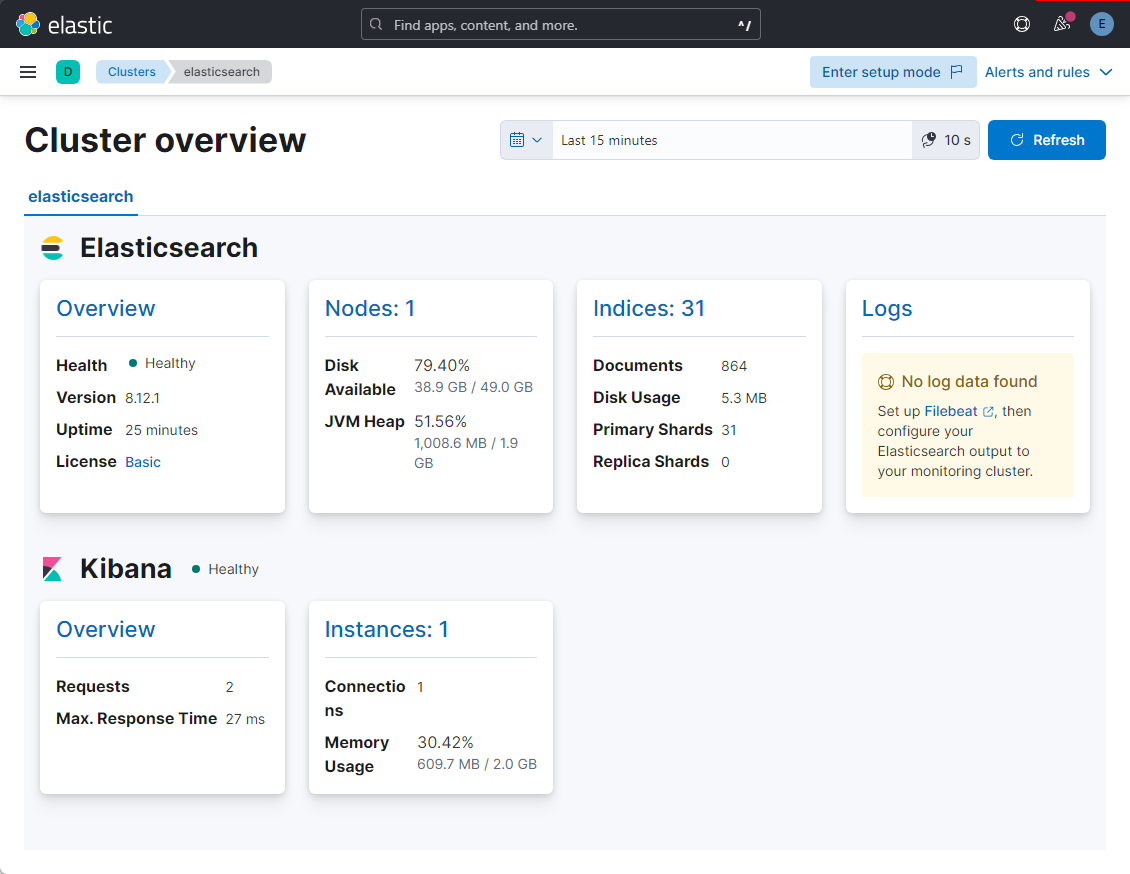
참고URL
- elasticsearch guide : Install Elasticsearch with Debian Package
- kibana guide : Install Kibana with Debian package
728x90
반응형
'리눅스' 카테고리의 다른 글
| 우분투에서 Elasticsearch 8.x 설치 및 클러스터 구성 방법 (0) | 2024.02.26 |
|---|---|
| 리눅스에서 ulimit을 설정하는 방법 (0) | 2024.02.26 |
| kubectl 명령어의 자동 완성을 활성화하는 방법 (0) | 2024.02.17 |
| HAProxy 구성을 동기화하고 HAProxy를 다시 시작하는 스크립트 (0) | 2024.02.17 |
| Helm을 사용하여 Ingress Controller를 설치하는 방법 (0) | 2024.02.17 |


