반응형
Gradle을 사용하여 Spring Boot 프로젝트를 생성하는 방법
1. Java 및 Gradle 설치
2. Spring Initializr
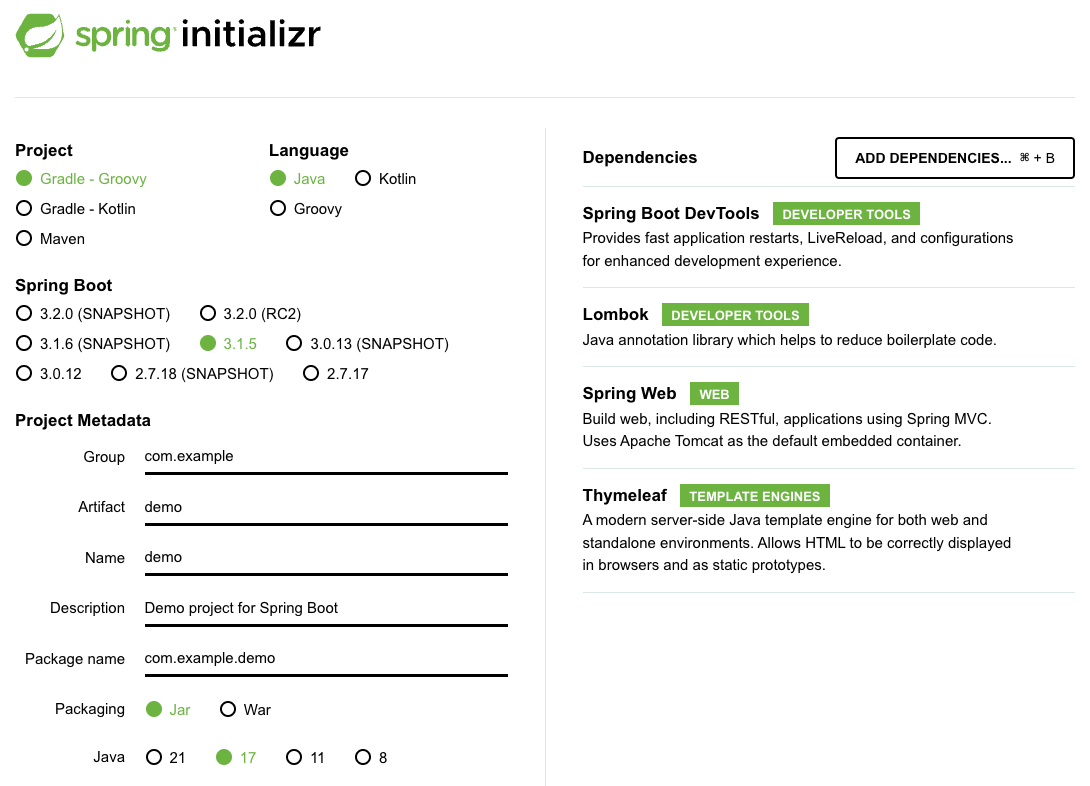
GENERATE하면 demo.zip 파일이 다운로드됩니다.
3. demo.zip 파일을 웹 서버(java, gradle)로 복사
scp demo.zip root@webserver:~4. 프로젝트 디렉토리 생성 및 이동
- 프로젝트 디렉토리 생성
mkdir spring-boot-hello-world- demo.zip 파일 압축 해제
sudo unzip -j /apps/demo.zip -d /apps/spring-boot-hello-world$ sudo unzip -j /apps/demo.zip -d /apps/spring-boot-hello-world
Archive: /home/apps/demo.zip
inflating: /apps/spring-boot-hello-world/HELP.md
inflating: /apps/spring-boot-hello-world/gradlew.bat
inflating: /apps/spring-boot-hello-world/.gitignore
inflating: /apps/spring-boot-hello-world/DemoApplication.java
inflating: /apps/spring-boot-hello-world/application.properties
inflating: /apps/spring-boot-hello-world/DemoApplicationTests.java
inflating: /apps/spring-boot-hello-world/gradle-wrapper.properties
inflating: /apps/spring-boot-hello-world/gradle-wrapper.jar
inflating: /apps/spring-boot-hello-world/settings.gradle
inflating: /apps/spring-boot-hello-world/build.gradle
inflating: /apps/spring-boot-hello-world/gradlew- 프로젝트 디렉토리로 이동
cd /apps/spring-boot-hello-world/demo- spring-boot-hello-world 프로젝트 구조
$ tree
.
├── build.gradle
├── gradle
│   └── wrapper
│       ├── gradle-wrapper.jar
│       └── gradle-wrapper.properties
├── gradlew
├── gradlew.bat
├── HELP.md
├── settings.gradle
└── src
    ├── main
    │   ├── java
    │   │   └── com
    │   │       └── example
    │   │           └── demo
    │   │               └── DemoApplication.java
    │   └── resources
    │       ├── application.properties
    │       ├── static
    │       └── templates
    └── test
        └── java
            └── com
                └── example
                    └── demo
                        └── DemoApplicationTests.java

16 directories, 10 files- 프로젝트 빌드
./gradlew build$ ./gradlew build
Java HotSpot(TM) 64-Bit Server VM warning: Sharing is only supported for boot loader classes because bootstrap classpath has been appended
Deprecated Gradle features were used in this build, making it incompatible with Gradle 9.0.
You can use '--warning-mode all' to show the individual deprecation warnings and determine if they come from your own scripts or plugins.
For more on this, please refer to https://docs.gradle.org/8.4/userguide/command_line_interface.html#sec:command_line_warnings in the Gradle documentation.
BUILD SUCCESSFUL in 19s
7 actionable tasks: 7 executed- 프로젝트 실행
- Spring Boot 애플리케이션을 실행합니다.
./gradlew bootRun- (또는) 스프링 부트 애플리케이션 실행
java -jar build/libs/demo-0.0.1-SNAPSHOT.jar$ java -jar build/libs/demo-0.0.1-SNAPSHOT.jar
. ____ _ __ _ _
/\\ / ___'_ __ _ _(_)_ __ __ _ \ \ \ \
( ( )\___ | '_ | '_| | '_ \/ _` | \ \ \ \
\\/ ___)| |_)| | | | | || (_| | ) ) ) )
' |____| .__|_| |_|_| |_\__, | / / / /
=========|_|==============|___/=/_/_/_/
:: Spring Boot :: (v3.1.5)
2023-11-20T20:35:25.709+09:00 INFO 28809 --- [ main] com.example.demo.DemoApplication : Starting DemoApplication v0.0.1-SNAPSHOT using Java 17.0.9 with PID 28809 (/apps/spring-boot-hello-world/demo/build/libs/demo-0.0.1-SNAPSHOT.jar started by root in /apps/spring-boot-hello-world/demo)
2023-11-20T20:35:25.711+09:00 INFO 28809 --- [ main] com.example.demo.DemoApplication : No active profile set, falling back to 1 default profile: "default"
2023-11-20T20:35:26.602+09:00 INFO 28809 --- [ main] o.s.b.w.embedded.tomcat.TomcatWebServer : Tomcat initialized with port(s): 8080 (http)
2023-11-20T20:35:26.612+09:00 INFO 28809 --- [ main] o.apache.catalina.core.StandardService : Starting service [Tomcat]
2023-11-20T20:35:26.612+09:00 INFO 28809 --- [ main] o.apache.catalina.core.StandardEngine : Starting Servlet engine: [Apache Tomcat/10.1.15]
2023-11-20T20:35:26.689+09:00 INFO 28809 --- [ main] o.a.c.c.C.[Tomcat].[localhost].[/] : Initializing Spring embedded WebApplicationContext
2023-11-20T20:35:26.690+09:00 INFO 28809 --- [ main] w.s.c.ServletWebServerApplicationContext : Root WebApplicationContext: initialization completed in 930 ms
2023-11-20T20:35:27.065+09:00 INFO 28809 --- [ main] o.s.b.w.embedded.tomcat.TomcatWebServer : Tomcat started on port(s): 8080 (http) with context path ''
2023-11-20T20:35:27.079+09:00 INFO 28809 --- [ main] com.example.demo.DemoApplication : Started DemoApplication in 1.713 seconds (process running for 2.081)
2023-11-20T20:35:54.488+09:00 INFO 28809 --- [nio-8080-exec-1] o.a.c.c.C.[Tomcat].[localhost].[/] : Initializing Spring DispatcherServlet 'dispatcherServlet'
2023-11-20T20:35:54.489+09:00 INFO 28809 --- [nio-8080-exec-1] o.s.web.servlet.DispatcherServlet : Initializing Servlet 'dispatcherServlet'
2023-11-20T20:35:54.491+09:00 INFO 28809 --- [nio-8080-exec-1] o.s.web.servlet.DispatcherServlet : Completed initialization in 1 ms- 웹 브라우저에서 확인
http://webserverip:8080
"Hello, world!"를 출력하는 방법
build.gradle 파일 생성
- 프로젝트 루트에 build.gradle 파일을 생성하고 아래 내용을 추가합니다.
vim build.gradleplugins {
id 'java'
id 'org.springframework.boot' version '3.1.5'
id 'io.spring.dependency-management' version '1.1.3'
}
group = 'com.example'
version = '0.0.1-SNAPSHOT'
java {
sourceCompatibility = '17'
}
configurations {
compileOnly {
extendsFrom annotationProcessor
}
}
repositories {
mavenCentral()
}
dependencies {
implementation 'org.springframework.boot:spring-boot-starter-thymeleaf'
implementation 'org.springframework.boot:spring-boot-starter-web'
compileOnly 'org.projectlombok:lombok'
developmentOnly 'org.springframework.boot:spring-boot-devtools'
annotationProcessor 'org.projectlombok:lombok'
testImplementation 'org.springframework.boot:spring-boot-starter-test'
}
tasks.named('bootBuildImage') {
builder = 'paketobuildpacks/builder-jammy-base:latest'
}
tasks.named('test') {
useJUnitPlatform()
}
SpringBootHelloWorldApplication.java 파일 생성
vim src/main/java/com/example/SpringBootHelloWorldApplication.javapackage com.example.demo;
import org.springframework.boot.SpringApplication;
import org.springframework.boot.autoconfigure.SpringBootApplication;
import org.springframework.web.bind.annotation.GetMapping;
import org.springframework.web.bind.annotation.RestController;
@SpringBootApplication
public class DemoApplication {
public static void main(String[] args) {
SpringApplication.run(DemoApplication.class, args);
}
}
@RestController
class HelloWorldController {
@GetMapping("/hello")
public String hello() {
return "Hello, world!";
}
}
프로젝트 빌드
- 프로젝트를 빌드합니다.
./gradlew build
스프링 부트 애플리케이션 실행
- 빌드가 완료되면 스프링 부트 애플리케이션을 실행합니다.
java -jar build/libs/demo-0.0.1-SNAPSHOT.jar프로젝트를 실행합니다.
웹 브라우저에서 확인
- 기본적으로 스프링 부트 애플리케이션은 http://localhost:8080에서 실행됩니다.
- 웹 브라우저에서 http://localhost:8080/hello로 접속하여 "Hello, world!"가 출력되는지 확인하세요.
http://192.168.0.51:8080/hello
이제 스프링 부트 프로젝트를 CentOS 7에서 Gradle을 사용하여 생성하고 "Hello, world!"를 출력하는 예제가 완성되었습니다.
반응형
'리눅스' 카테고리의 다른 글
| Ubuntu 22.04에서 Gradle을 설치하는 방법 (0) | 2023.11.20 |
|---|---|
| 우분투에 JDK 17을 설치하고 환경 변수를 설정하는 방법 (0) | 2023.11.20 |
| CentOS 7에서 Gradle을 설치하는 방법 (0) | 2023.11.20 |
| CentOS 7에서 JDK 17(JAVA)을 설치하는 방법 (0) | 2023.11.20 |
| 우분투 패키지 관리자에서 GPG 키 관련 오류 해결 (1) | 2023.11.18 |


