리눅스
우분투에서 Postfix를 설치하고 테스트하는 방법
변군이글루
2025. 1. 21. 21:53
반응형
우분투 24.04에서 Postfix를 설치하고 테스트하는 방법
테스트 환경
$ lsb_release -d
Description:	Ubuntu 24.04.1 LTS
1. Postfix 설치
sudo apt update
sudo apt install -y postfix
설치 중에 Postfix 설정 구성 화면이 나타납니다.
- "General type of mail configuration"에서 "Internet Site"를 선택합니다.
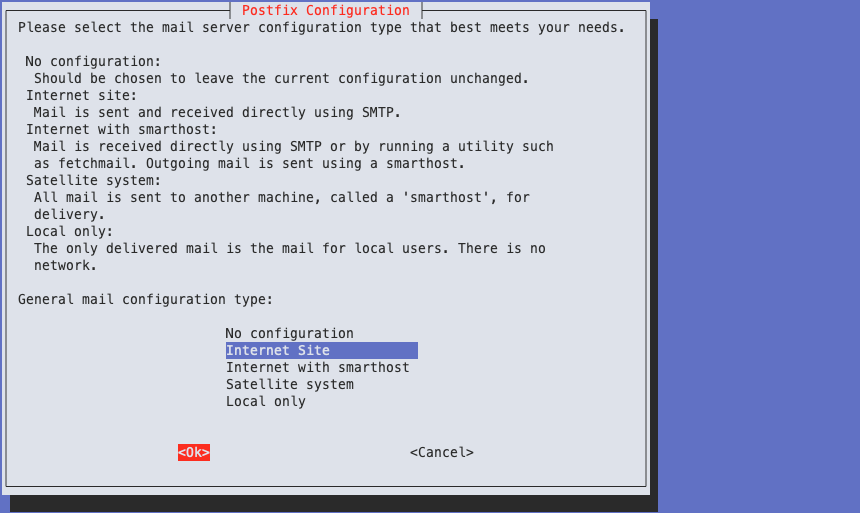
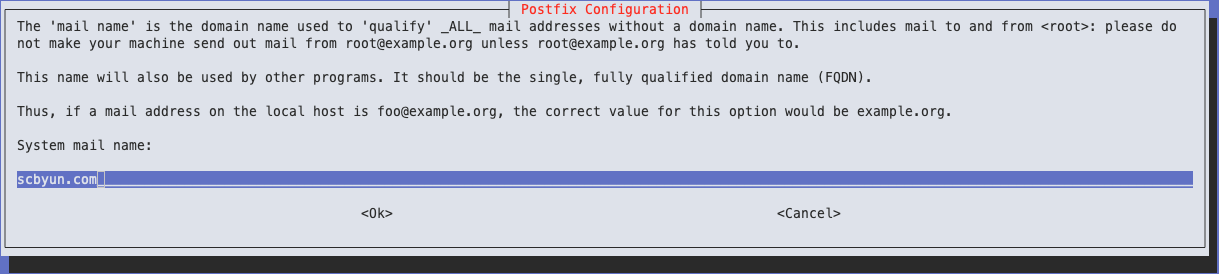
- "System mail name"에 서버의 FQDN(예: mail.example.com)을 입력합니다.
설치가 완료되면 기본 설정 파일이 /etc/postfix/main.cf에 생성됩니다.
더보기
---
cat /etc/postfix/main.cf# See /usr/share/postfix/main.cf.dist for a commented, more complete version
# Debian specific: Specifying a file name will cause the first
# line of that file to be used as the name. The Debian default
# is /etc/mailname.
#myorigin = /etc/mailname
smtpd_banner = $myhostname ESMTP $mail_name (Ubuntu)
biff = no
# appending .domain is the MUA's job.
append_dot_mydomain = no
# Uncomment the next line to generate "delayed mail" warnings
#delay_warning_time = 4h
readme_directory = no
# See http://www.postfix.org/COMPATIBILITY_README.html -- default to 3.6 on
# fresh installs.
compatibility_level = 3.6
# TLS parameters
smtpd_tls_cert_file=/etc/ssl/certs/ssl-cert-snakeoil.pem
smtpd_tls_key_file=/etc/ssl/private/ssl-cert-snakeoil.key
smtpd_tls_security_level=may
smtp_tls_CApath=/etc/ssl/certs
smtp_tls_security_level=may
smtp_tls_session_cache_database = btree:${data_directory}/smtp_scache
smtpd_relay_restrictions = permit_mynetworks permit_sasl_authenticated defer_unauth_destination
myhostname = node177
alias_maps = hash:/etc/aliases
alias_database = hash:/etc/aliases
myorigin = /etc/mailname
mydestination = $myhostname, scbyun.com, node177, localhost.localdomain, localhost
relayhost =
mynetworks = 127.0.0.0/8 [::ffff:127.0.0.0]/104 [::1]/128
mailbox_size_limit = 0
recipient_delimiter = +
inet_interfaces = all
inet_protocols = all---
2. Postfix 설정 확인 및 변경
기본 설정을 편집합니다.
sudo vim /etc/postfix/main.cf주요 설정
- 메일 도메인 설정 (필요 시 수정)
myhostname = mail.example.com
mydomain = example.com
myorigin = $mydomain- 네트워크 수신 설정
inet_interfaces = all
inet_protocols = ipv4- 메일 릴레이 허용 네트워크
mynetworks = 127.0.0.0/8 [::1]/128- TLS 설정 (필요 시 추가)
smtpd_tls_cert_file=/etc/ssl/certs/ssl-cert-snakeoil.pem
smtpd_tls_key_file=/etc/ssl/private/ssl-cert-snakeoil.key
smtpd_tls_security_level=may
/etc/mailname 설정
sudo vim /etc/mailnamepostfix.scbyun.comcanonical 맵 설정
sudo vim /etc/postfix/sender_canonicalroot@postfix.scbyun.com설정 변경 후 Postfix를 다시 시작합니다.
sudo postfix checksudo systemctl restart postfix3. relayhost 설정
구글 앱 비밀번호 생성
- 변군이글루 블로그(Byeon-gun's Igloo Blog) : Google 앱 비밀번호를 생성하는 방법
Postfix 구성 파일에서 relayhost를 설정합니다.
sudo vim /etc/postfix/main.cfrelayhost = [smtp.gmail.com]:587
smtp_use_tls = yes
smtp_tls_security_level = encrypt
smtp_sasl_auth_enable = yes
smtp_sasl_password_maps = hash:/etc/postfix/sasl_passwd
smtp_sasl_mechanism_filter = plain
smtp_sasl_security_options = noanonymoussasl_passwd 파일 생성
- Google SMTP 계정의 자격 증명을 /etc/postfix/sasl_passwd 파일에 저장해야 합니다.
sudo vim /etc/postfix/sasl_passwd[smtp.gmail.com]:587 username@gmail.com:password저장 후 다음 명령으로 해시 맵을 생성합니다.
sudo postmap /etc/postfix/sasl_passwd
sudo chmod 600 /etc/postfix/sasl_passwd /etc/postfix/sasl_passwd.db
4. 방화벽 설정(선택 사항)
Postfix가 외부에서 수신하려면 포트 25번을 열어야 합니다.
sudo ufw allow 25/tcp
sudo ufw reload
5. 테스트
mailutils 패키지 설치
sudo apt install -y mailutils5.1 로컬 이메일 전송
echo "Test email body" | mail -s "Test email subject" your-email@example.com5.2 로그 확인
Postfix가 이메일을 처리하는 과정을 확인하려면 로그 파일을 확인합니다.
sudo tail -f /var/log/mail.log5.3 원격 이메일 수신 확인
다른 메일 서버에서 해당 서버(예: mail.example.com)로 이메일을 보내 테스트합니다. 이메일이 수신되면 /var/mail/username 또는 /var/spool/mail/username 파일에 저장됩니다.
6. Postfix 상태 확인
Postfix가 정상적으로 실행 중인지 확인
sudo systemctl status postfix추가 구성
- SMTP 인증(SASL) : 클라이언트 인증을 통해 스팸 방지 강화
- SPF, DKIM, DMARC : 메일의 신뢰성을 보장하기 위한 DNS 레코드 설정
- Relay 설정 : Gmail 또는 외부 SMTP 서버로 릴레이 필요 시 relayhost 설정
728x90
반응형