Fluentd를 사용하여 데이터를 집계하고 Elasticsearch와 AWS S3로 전달하는 방법(Aggregation and Forwarding with Fluentd)

서버 구성
| 노드(forwarder) | 서버(aggregator) | 서버(destination) | 서버(visualization) | 비고 |
| fluentd | fluentd | elasticsearch | kibana | |
| fluentbit | aws s3 | |||
| td-agent | ||||
| td-agent-bit |
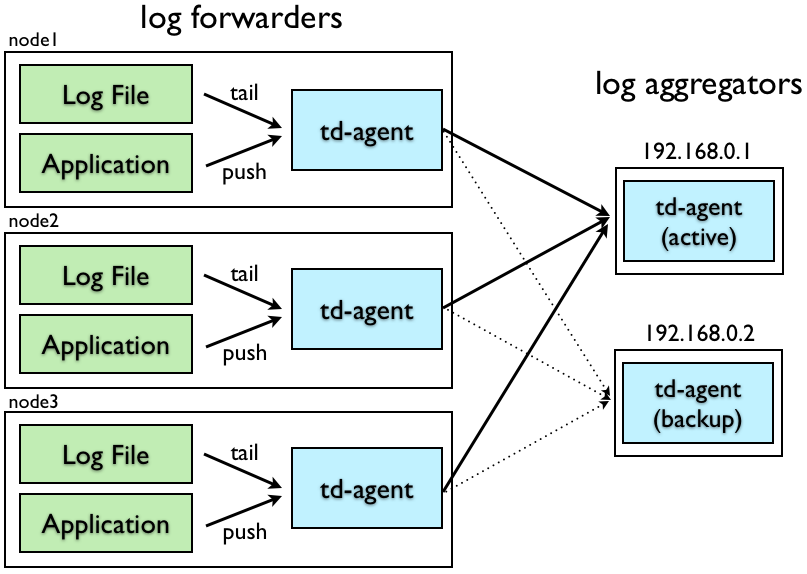
- Log forwarders(로그 전달자)는 일반적으로 로컬 이벤트를 수신하기 위해 모든 노드에 설치됩니다. 이벤트가 수신되면 네트워크를 통해 'Log aggregators'로 전달합니다. 로그 전달자의 경우 fluent-bit도 경량 처리에 적합합니다.
- Log aggregators(로그 집계자)는 로그 전달자로부터 지속적으로 이벤트를 수신하는 데몬입니다. 이벤트를 버퍼링하고 주기적으로 데이터를 클라우드에 업로드합니다.
1. Fluentd 설치
Fluentd를 설치합니다.
# 예를 들어, Ubuntu에서 설치하는 경우
curl -L https://toolbelt.treasuredata.com/sh/install-ubuntu-focal-td-agent4.sh | sh
2. Fluentd 설정 파일 만들기
Fluentd는 설정 파일을 사용하여 동작하며 주로 td-agent.conf 또는 fluent.conf와 같은 파일에 설정이 기록됩니다.
- 서버 에이전트(Fluentd or td-agent) 구성
- 서버에서 로그 데이터를 수집하는 데 사용할 Fluentd 또는 td-agent를 설치합니다. 서버 에이전트는 데이터를 수집하고 전송할 역할을 합니다.
# TCP input
<source>
  @type forward
  port 24224
</source>

# HTTP input
<source>
  @type http
  port 8888
</source>

# Syslog input
<source>
  @type syslog
  port 24514
  bind 0.0.0.0
  tag syslog
</source>

# Log Forwarding
<match mytag.**>
  @type forward

  # primary host
  <server>
    host 192.168.0.1
    port 24224
  </server>
  # use secondary host
  <server>
    host 192.168.0.2
    port 24224
    standby
  </server>

  # use longer flush_interval to reduce CPU usage.
  # note that this is a trade-off against latency.
  <buffer>
    flush_interval 60s
  </buffer>
</match>- 서버 집계(Fluentd Aggregation) 구성
- 서버 에이전트의 구성 파일에 데이터를 집계하는 설정을 추가합니다. 이 설정은 로그 데이터를 수집하고 필요한 형식으로 가공하는 역할을 합니다.
# Input(Nodes)
<source>
  @type forward
  port 24224
  bind 0.0.0.0
</source>

# Syslog
<source>
  @type syslog
  port 24514
  bind 0.0.0.0
  tag syslog
</source>

<match mytag.**>
<store>
  @type file
  path /tmp/fluentd/local
  compress gzip
  <buffer>
    timekey 1d
    timekey_use_utc true
    timekey_wait 10m
  </buffer>
</store>

<store>
  @type elasticsearch
  host localhost
  port 9200
  logstash_format true
</store>

<store>
  @type s3
  aws_key_id YOUR_AWS_KEY_ID
  aws_sec_key YOUR_AWS_SECRET_KEY
  s3_bucket YOUR_S3_BUCKET_NAME
  s3_region ap-northeast-1
  path vpc-5726398/logs
  <buffer tag,time>
    @type file
    path /tmp/fluentd/s3
    timekey 3600 # 1 hour partition
    timekey_wait 10m
    timekey_use_utc true # use utc
    chunk_limit_size 256m
  </buffer>
</store>
</match>
3. Elasticsearch 설정
Elasticsearch 서버에 로그 데이터를 전송하기 위한 Elasticsearch 구성을 추가합니다. Elasticsearch 호스트와 포트 등을 필요에 따라 수정합니다.
4. AWS S3 설정
AWS S3로 로그 데이터를 전송하기 위한 AWS S3 구성을 추가합니다. AWS 액세스 키, 시크릿 키, S3 버킷 이름 등을 필요에 따라 수정합니다.
참고URL
- high-availability : https://docs.fluentd.org/deployment/high-availability
- output-file : https://docs.fluentd.org/output/file
- output-elasticsearch : https://docs.fluentd.org/output/elasticsearch
- output-s3 : https://docs.fluentd.org/output/s3
- Fluentd vs. Fluent Bit(Side by Side Comparison) : https://logz.io/blog/fluentd-vs-fluent-bit/
'리눅스' 카테고리의 다른 글
| unable to resolve host hostname 오류 (0) | 2023.02.20 |
|---|---|
| 우분투에서 rsyslog를 사용하여 로그를 원격으로 전송하는 방법 (0) | 2023.02.18 |
| [리눅스] Elasticsearch REST APIs (0) | 2023.02.17 |
| [리눅스] td-agent plugin(td-agent 플러그) (0) | 2023.02.17 |
| 우분투에서 td-agent를 설치하는 방법 (0) | 2023.02.17 |


